
Do you know there are ways to hide files and folders and make them invisible? Normally you have the option to check or uncheck the “hidden items” checkbox in the Explorer, as shown in the screenshot below:
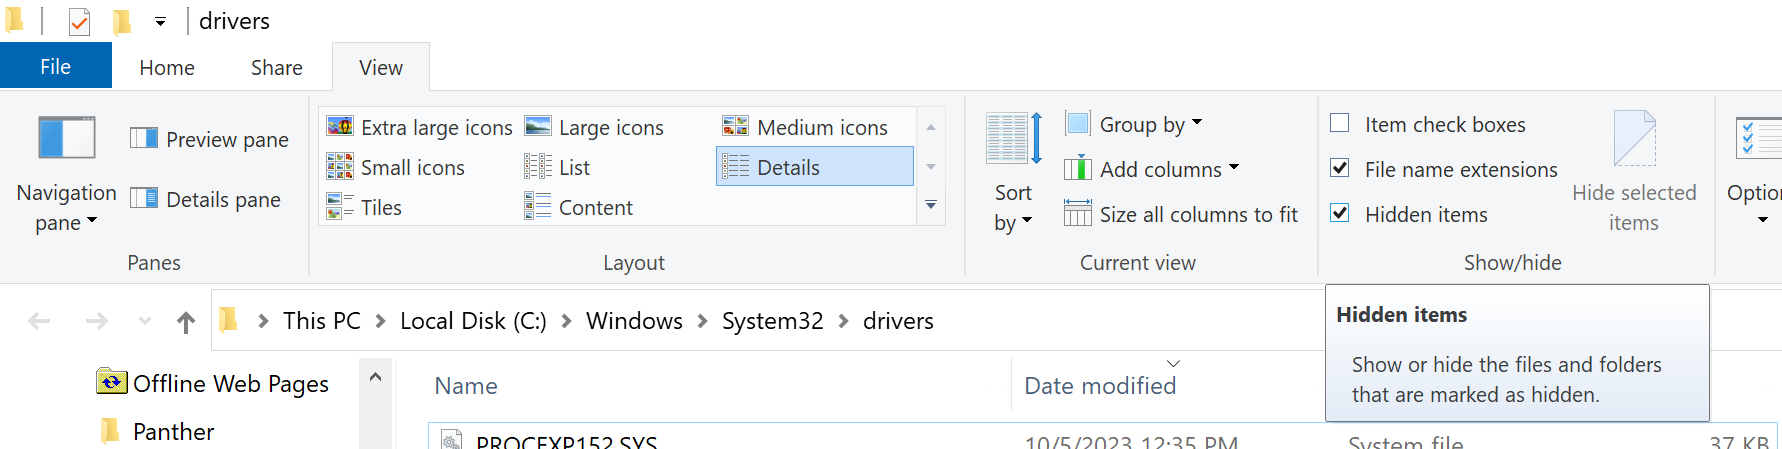
Nevertheless, when a file or a folder is hidden at the lowest level, it won’t show even if the “hidden items” option is checked.
In the digital age, privacy and security are of paramount importance. While operating systems like Windows provide basic mechanisms to hide files and folders, these methods can often be circumvented. In this blog post, we’ll explore a more robust approach to hiding files and folders using a custom filesystem driver in C++20. This technique ensures that hidden files and folders remain concealed even at the lowest system level.
Why hide files or folders
The need for advanced file and folder hiding techniques arises when you want to protect sensitive data from prying eyes or malicious software. By creating a filesystem driver, we can create a mechanism for truly hiding that sensitive data. Other use cases may be Lawful Interception.
Developing a Custom Filesystem Driver
Creating a custom filesystem driver is an advanced and challenging task that requires in-depth knowledge of system programming and kernel-level development. The slightest bug may bring the well-known BSOD. Always conduct code review. Here is a high-level overview of the steps involved:
- Setting up the Development Environment
To develop a filesystem driver in C++20, you’ll need a Windows development environment with the Windows Driver Kit (WDK) installed. You’ll also need a code editor that supports kernel-mode development. - Designing the Driver
The first step in creating a filesystem driver is to design it. You’ll need to decide how your driver will intercept file and folder operations and determine the mechanisms for hiding and revealing them. - Writing the Code
Implement your filesystem driver using C++20, adhering to the Allman code style indentation, as mentioned in the user profile. You’ll need to handle functions like file creation, deletion, and enumeration, ensuring that your driver can identify hidden files and folders and prevent them from being displayed. - Compiling and Testing
Compile your driver and load it into a test environment. Thoroughly test its functionality, ensuring that hidden files and folders remain invisible, even to users and applications with elevated privileges. - Deployment and Security Considerations
If your tests are successful, consider the deployment of your filesystem driver with caution. Kernel-level development carries significant risks, and deploying a flawed driver can destabilize the system. Ensure that your driver is well-documented and thoroughly reviewed for security vulnerabilities.
Hiding files and folders at a low-level using a custom filesystem driver in C++20 is a powerful technique for enhancing data security and privacy. However, it’s essential to approach this task with caution and expertise, as kernel-level development can be complex and carries significant risks. Always prioritize system stability and security when developing and deploying such drivers.
Code Signing requirements
Requirements for Submitting a Driver to Microsoft Labs
Driver Stability and Security: Your driver must be thoroughly tested and verified for stability and security. It should not introduce system instability or security vulnerabilities. Ensure that your code adheres to best practices for kernel-mode development.
Driver Compatibility: The driver should be compatible with the target Windows operating systems (e.g., Windows 10, and Windows 11). Microsoft may require you to provide documentation specifying which OS versions your driver is intended for.
Clean Code: Make sure your code is well-documented and follows established coding standards and practices, such as using the Allman code style indentation as specified in your user profile.
Driver Package: Create a driver package that includes the driver binaries, INF files, and any necessary support files. The INF file provides installation instructions to Windows and specifies the driver’s information.
Driver Testing: Perform rigorous testing on various Windows configurations to ensure compatibility and stability. You should also verify that the driver can be properly installed and uninstalled.
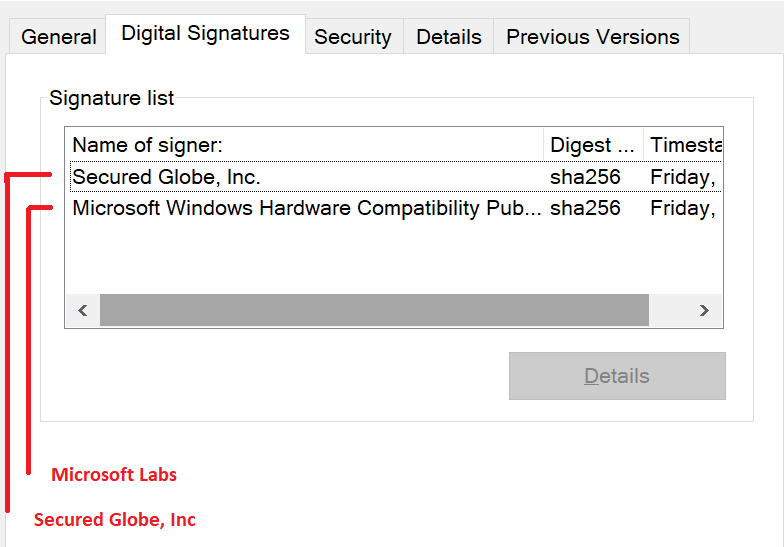
Digital Signature: Your driver package should be digitally signed with a valid code signing certificate. Microsoft Labs will not sign drivers without proper digital signatures.
The Process of Submitting a Driver to Microsoft Labs
Prepare Your Driver Package: Ensure that your driver package includes all necessary files, including the driver binaries, INF file, and any additional files required for installation or operation.
Acquire a Code Signing Certificate: If you don’t already have a code signing certificate, you’ll need to obtain one from a trusted Certificate Authority (CA). Microsoft recommends using a certificate issued by a CA that is a member of the Windows Hardware Developer Program. Since January 2016, and as I explained in this article, you need an EV Code Signing Certificate and each driver must be counter-signed by Microsoft as well.
Driver Submission: Visit the Windows Hardware Dev Center Dashboard (https://partner.microsoft.com/en-us/dashboard/hardware). If you don’t have an account, you’ll need to create one. Once logged in, you can start the driver submission process.
Fill in Driver Information: Provide information about your driver, including its name, version, and a brief description. Specify the hardware IDs and compatible IDs for the devices your driver supports.
Upload Driver Package: Upload your driver package to the Windows Hardware Dev Center. Ensure that the package is complete and correctly configured. Note that to create such a package, you would need to sign the driver file/s first, then create a special archive called .cab, and then sign that .cab again. Here is an article I wrote about the process.
Code Signing Request: During the submission process, you’ll be prompted to submit a request for code signing. Provide the details of your code signing certificate, and Microsoft Labs will use it to sign your driver package.
Review and Validation: Microsoft Labs will review your driver submission for compliance with their requirements. This process may take some time, and they may contact you for additional information or clarifications.
Digital Signature: Once your driver package is approved, Microsoft Labs will digitally sign it with a Microsoft signature. This signature signifies that the driver has passed their review and is safe for installation on Windows systems.
Note: in many cases, Microsoft will not sign the driver and in that case, you will have to download a report specifying the reasons for the rejection, and then fix whatever needs to be fixed and go through the entire process again.
Download the Signed Driver: After your driver package is signed, you can download the signed package from the Windows Hardware Dev Center.
Distribution: Distribute your signed driver to your users or through appropriate channels, knowing that it has the Microsoft signature, which enhances its trustworthiness.
How to enjoy both worlds
There is an option to enjoy both worlds. Obtain a Source Code license for a ready-made source code project, where you have everything you need to add file and folder hiding capabilities to your software.
We have developed everything needed, so you don’t even have to code sign any driver, but just use a ready-made SDK and the source code. These can be obtained here and is demonstrated in this video.
